The War Garden Victorious
Victory Edition 1919 HOME CANNING & DRYING of Vegetables & Fruits

HOME CANNING MANUAL
CAN ALL FOOD THAT CAN BE CANNED

 HIGH ALTITUDES

   At high altitudes the boiling point of water is below 212° F. At moderate elevations satisfactory results may be obtained in the use of the hot-water bath by increasing the time of sterilization 10 per cent for every 500 feet above 1000. To insure best results in very high altitudes, however, a steam pressure canner or aluminum pressure cooker is recommended to be used. This type of canner produces a temperature up to 250 ° F. at 15 lbs. pressure, insuring proper sterilization and also saving time and fuel. A steam pressure canner may be bought around $20. Several families may use one, and divide the cost.

Home canner and steam cooker holding 14 quart jars.

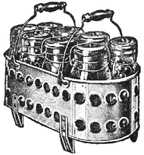
Fig. 7. Home canner and steam cooker holding 14 quart jars. Requires same time as hot-water bath.

OPERATION OF PRESSURE CANNERS AND ALUMINUM COOKERS

   1. Have water in the canner up to the false bottom, but not above it. Keep this water boiling during the time that packed jars are being placed in the canner, and add water occasionally to prevent its boiling dry.
   2. To prepare product follow instructions in "Steps in the Single Period Cold-pack Method" on pages 8 and 9. As each jar is packed, set it at once, partially sealed, into the canner. The cover of the canner may be put in position, but not clamped.
   3. When all of the filled jars are placed in the canner, put on the cover, and fasten opposite clamps moderately tight; then tighten each pair of clamps fully.
   4. The petcock should be left open until live steam escapes from it. The canner should be steam-tight, and no steam should escape except through the open petcock. When live steam escapes, close the petcock completely.
   5. Begin to count time when the steam gauge registers the required temperature.
   6. Maintain a uniform pressure during the sterilizing period by setting the weight on the arm, when the proper pressure is registered on the steam gauge, so that surplus stem will escape at that desired pressure. A uniform temperature may be maintained also, by turning down the flame or moving the canner to a less hot part of the stove.
7.   When the sterilization period is complete, do not allow steam to escape, but allow the canner to cool until the steam gauge registers zero.
   8. Open petcock, remove the cover of canner, and take out the jars. As each jar is removed, complete seal at once.

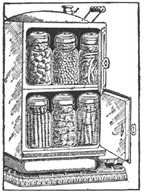
 CONTAINERS

   For home use glass jars are more satisfactory for canning than tin. This is especially true this year when there is a shortage of tin cans. Tin cans are used chiefly for canning on a large scale for commercial purposes.
   There are many jars of different styles and prices on the market; and provided the seal is not defective, equally good results may be obtained from all. Glass is a popular household choice because one can see through it and thus have some idea as to the condition of the contents. Glass jars may be used for years if properly cared for.
   All types of jars which seal readily may be use. Jars having glass tops held in place by bails are especially easy to handle while hot. Screw-top jars are serviceable. Glass caps held in place by separate metal screw bands are now on the market, as well as the one-piece sort of former years. Vacuum seal jars are very easily managed. Tops for Economy jars should be purchased each year. The composition material. which takes the place of rubber, should have a rubber-like texture. If of mealy consistency it is unfit for use and the top will not make a tight seal.
   The color and shape of jars are not of first moment, but are to be considered. Containers made of white glass should be used if the product is to be offered for sale, as blue or green glass detracts from the appearance of the contents. Wide-mouthed jars are best for packing whole products and are easiest to clean. Small-necked bottles can be used for fruit juices. Large-mouthed bottles can be used for jams, marmalades and jellies.

Rack for jars
Fig. 8 Rack for jars.

TESTS FOR JARS

   Jars should be tested before they are used. Some of the important tests are here given:

   1. Glass-top Jars.––First examine for cracks. Then run a finger around the edge of necks of jars, and if there are sharp projections, file them off, or scrape them off with an old knife. If left on they may cut rubbers and interfere with perfect sealing. Place a top on a jar. It will slip from side to side, but should not rock, when tapped. Rocking tops will not make a tight seal. Sometimes the fault is with the top and sometimes with the neck. Defective jars and tops when discarded for canning purposes may be used as containers for jams, etc. The top-bail should go into position with a light snap. If too loose it should be taken off and bent slightly inward in the center. If too tight bend outward