Welcome to the world of Victory Gardens! In times of crisis and uncertainty, one thing that remains constant is our ability to connect with nature. And what better way to do that than by growing fresh produce in your backyard? This concept may seem like a trend from the past, but it has never been more relevant than it is now.
In this document, we will delve into the world of Victory Gardens, exploring their role in history and their impact on modern challenges. We will also discuss the definition of Victory Gardens and why they are returning today.
So, whether you’re a seasoned gardener or looking to start your first garden, keep reading to discover everything you need about Greening the Future through Victory Gardens.
Victory Gardens – What are they, why were they created and what are the benefits of them now?
Victory Gardens, also known as War Gardens or Food Gardens for Defense, were vegetable, fruit, and herb gardens planted by citizens during World Wars I and II. The concept was initiated in response to food shortages caused by the war and aimed to supplement the rationed food supply.
These gardens played a crucial role in providing fresh produce to families, reducing the strain on government resources, and boosting morale during difficult times. Victory Gardens also promoted self-sufficiency and connected people with nature in an urbanized society.
Today, Victory Gardens is returning due to the increasing concerns about food security, environmental sustainability, and health. With rising global populations and issues such as climate change and food deserts, Victory Gardens offers numerous benefits. They provide access to fresh, locally grown produce, reduce the carbon footprint of food production and transportation, and promote a healthier lifestyle.
History of Victory Gardens – How did they help during war times?
The first Victory Garden campaign was launched in 1917 by the US government to encourage citizens to grow their food and reduce the demand for commercial agriculture, which was struggling due to labor shortages and transportation issues. At the peak of World War I, over 5 million gardens were planted across the United States, producing an estimated 1.45 million quarts of canned fruits and vegetables.
During World War II, Victory Gardens once again became a crucial part of the war effort. With a large portion of commercial agriculture production going towards feeding the troops, citizens were encouraged to start their gardens to ensure an adequate food supply for themselves and their families. The US government launched a nationwide campaign called “Grow Your Own, Can Your Own” to promote Victory Gardens.
The impact of these gardens was significant. By 1944, Victory Gardens produced around 40% of all vegetables consumed in the United States. This provided much-needed food and boosted morale and patriotism among citizens who felt they were contributing to the war effort.
Victory Gardens were not just limited to the United States but also popular in many other countries involved in World War II, such as Canada, Australia, and the United Kingdom. The British government launched a nationwide campaign called “Dig for Victory” in 1940, which encouraged citizens to grow food in any available space including backyards, rooftops, and even public parks.
After World War II ended, the popularity of Victory Gardens declined as commercial agriculture resumed its normal production levels. However, they experienced a resurgence during the 1970s when there was a growing concern over food security and the environmental impact of industrialized agriculture.
With increasing awareness about climate change and sustainability, Victory Gardens is gaining popularity again. Community gardens are becoming more common in cities and urban areas as people seek to grow fresh produce using organic methods. This helps reduce the carbon footprint of food production and transportation and promotes healthy eating habits and a sense of community.
The Revival of Victory Gardens – What are the benefits today?
In recent years, there has been a resurgence of interest in Victory Gardens, particularly in developed countries. The term “Victory Garden” originated during World War I and II, when civilians were encouraged to grow their fruits and vegetables as a way to support the war effort and relieve pressure on the food supply.
Today, the concept of Victory Gardens has evolved to encompass more than just growing food for wartime efforts. It has become a symbol of self-sufficiency, sustainability, and community building.
In the United States, numerous initiatives are promoting Victory Gardens as a way to address issues such as food insecurity, climate change, and urbanization. The American Victory Garden movement has gained momentum in recent years, with organizations like the Victory Garden Initiative providing resources and education for individuals and communities to grow their food.
In Europe, Victory Gardens have also gained popularity to promote environmental awareness and reduce carbon footprint. In countries like France, Germany, and the UK, urban gardening projects have been launched to encourage citizens to grow food in small spaces such as balconies or rooftops.
However, in developing countries, the concept of Victory Gardens has received less attention. While there are certainly local initiatives and programs advocating for home gardening, they often need help with challenges such as lack of resources and infrastructure, limited access to land, and cultural barriers. Moreover, the idea of growing one’s own food may seem outdated or irrelevant in countries where agriculture is a major industry. In these regions, the focus may be on improving farming practices and supporting small-scale farmers rather than promoting Victory Gardens.
How Victory Gardens Can Support Communities Around the Globe?
Today, the concept of Victory Gardens has been revived in response to global issues such as climate change, food insecurity, and economic instability. Global communities are turning to these gardens to promote sustainability, strengthen local economies, and foster community connections.
Promoting Sustainability :
Victory Gardens are a simple yet effective way to promote sustainable living practices. By growing fruits and vegetables at home, individuals can reduce their carbon footprint by eliminating the need to transport produce from farms to markets. Additionally, Victory Gardens promotes organic gardening practices, reducing the use of harmful pesticides and fertilizers that contribute to environmental degradation.
Strengthening Local Economies :
Victory Gardens provide an opportunity for individuals and communities to become more self-sufficient in terms of food production. By growing their produce, individuals can save money on groceries and support local businesses by purchasing supplies and tools from local retailers. This can also create job opportunities for individuals with knowledge and experience in gardening, leading to economic growth within the community.
Fostering Community Connections :
Planning, planting, and harvesting a Victory Garden can unite people and foster community. Neighbors can work together in communal gardens, sharing resources and skills to create a thriving green space. This can also provide an opportunity for intergenerational connections, as older adults with gardening experience can pass on their knowledge and skills to younger generations.
Overall, Victory Gardens significantly promotes sustainability, strengthens local economies, and fosters community connections. By encouraging individuals to grow their produce and come together in communal gardens, we can create a more sustainable and connected future for our communities.

How to Start Your Own Victory Garden?
Planning is a crucial step in the success of any venture, and starting a victory garden is no different. Victory gardens are becoming increasingly popular because of their many benefits to our health, environment, and wallets. These gardens allow us to grow our food at home, reduce our grocery bills and have fresh produce available whenever needed.
But before you break out your gardening tools and start digging, it’s important to have a well-thought-out plan. This will not only help ensure the success of your garden but also make the whole process more enjoyable for you. Here are some practical steps to consider when planning your victory garden:
- Determine Your Goals: The first step in planning any garden is determining what you want to achieve. Are you looking to save money on groceries? Do you want to have a sustainable source of fresh produce? Or are you simply looking for a new hobby? Understanding your goals will help guide your decisions throughout the planning process.
- Choose Your Location: Victory gardens can be grown in almost any space – from large backyards to small balcony containers. Consider the amount of sunlight, water access, and soil quality when choosing the location for your garden. Also, make sure to leave enough space for walking and harvesting.
- Decide on Your Garden Type: There are many types of victory gardens you can choose from – traditional in-ground gardens, raised beds, container gardens, or even hydroponic systems. Each type has advantages and disadvantages, so choose the one that best fits your goals and available space.
- Select Your Crops: Once you have determined your garden type, it’s time to decide on what crops to grow. Consider the climate in your area, the amount of sunlight and water needed for each crop, and their growing season. It’s also important to choose a variety of vegetables and herbs to ensure a diverse and nutritious harvest.
- Plan Your Layout: Before you start planting, it’s important to plan out the layout of your garden. Consider which crops grow better together and rotate each season to maintain soil health. Also, leave enough space for pathways and consider using vertical gardening techniques to maximize space.
- Gather Your Supplies: Once your garden is planned, it’s time to gather your supplies. This may include seeds, seedlings, gardening tools, soil amendments, and fertilizers. Consider purchasing from local or organic sources to support sustainability.
- Start Planting: With all the necessary supplies gathered, it’s time to start planting! Follow the seed packet instructions or consult a gardening expert for guidance on proper planting techniques and depth. Remember to water regularly and provide adequate sunlight for your plants.
- Maintenance and Care: As your garden grows, it’s important to maintain and care for it properly. This may include watering, controlling pests and weeds, adding organic fertilizers, and harvesting at the right time. Regularly check for any signs of disease or nutrient deficiencies and address them promptly.
- Enjoy Your Harvest: After all your hard work, it’s time to enjoy the fruits (and vegetables) of your labor! Harvest your crops when they are ripe and use them in delicious recipes or share with friends and family. Remember to save seeds for next season’s garden as well.
- Expand Your Knowledge: Gardening is a continuous learning process, so don’t be afraid to expand your knowledge and try new techniques. Attend gardening workshops or classes, join a community gardening group, or experiment with different crops and methods in your garden. The more you learn and practice, the more your gardening skills will improve! Keep growing and enjoying the benefits of having your very own vegetable garden.
- Share Your Bounty: One of the joys of having a vegetable garden is sharing your harvest with others. Consider donating excess produce to local food banks or sharing it with neighbors and friends. This helps reduce food waste and allows others to experience the satisfaction of homegrown vegetables.
- Embrace Seasonal Planting: To get the most out of your garden, embracing seasonal planting is important. This means choosing crops appropriate for your area’s current season and climate. Research what types of plants thrive during specific times of the year and plan accordingly.
- Use Sustainable Practices: As a gardener, it’s essential to prioritize sustainability in your practices. This includes using organic pest and disease control methods, composting to improve soil health, and conserving water through techniques like drip irrigation. By caring for the environment, we can continue to enjoy gardening for years.
- Spread the Love: Share your love for gardening with others! Encourage friends and family to start their gardens or volunteer at local community gardens. Not only does this promote a healthier lifestyle, but it also helps create a sense of community and connection with others.
- Continue Learning: Gardening is an ever-evolving activity; there is always something new to learn. Keep expanding your knowledge by reading books and articles, attending gardening events and workshops, or connecting with experienced gardeners for garden tips and advice. With each season, you’ll become a more skilled and knowledgeable gardener.
Some practical applications of modern victory gardens – from window boxes to rooftop gardens
There are many creative ways to incorporate a modern victory garden into your daily life, regardless of whether you have access to a yard. This section will explore some practical applications of victory gardens for those living in apartments or small spaces.
Window Boxes :
Window boxes are an excellent way to add greenery and fresh produce to your living space. They can be easily mounted on a windowsill or balcony railing, providing ample sunlight for plants to thrive. You can grow herbs, small vegetables, and fruits in window boxes.
Choosing the right plants
When selecting plants for your window box, it’s essential to consider the amount of sunlight your window receives throughout the day. Most vegetables require at least six hours of direct sunlight, while herbs can thrive in partial shade. Some popular plants for window boxes include cherry tomatoes, lettuce, chives, and basil.
Maintenance tips
To ensure your window box garden flourishes, it’s important to water and fertilize the plants regularly. You may also need to prune them occasionally to promote growth and prevent overcrowding. Be sure to use a high-quality potting mix and provide adequate plant drainage.
Vertical Gardens :
If you have limited horizontal space, vertical gardens are an excellent option for growing your food. These gardens utilize vertical wall space and can be created using various materials, such as pallets or hanging baskets.
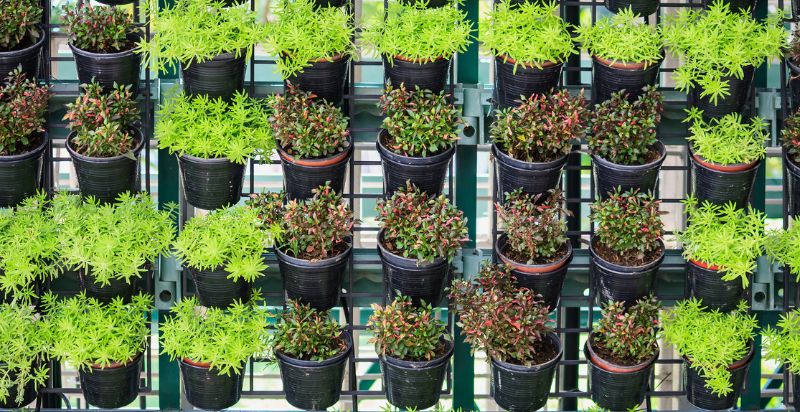
Creative ideas for vertical gardens
You can get creative with your vertical garden and use unconventional containers such as old shoe organizers, gutters, or even repurposed plastic bottles. You can also mix and match different types of plants to create a visually appealing display.
Important considerations
When creating a vertical garden, choosing lightweight materials and securing them properly is crucial to prevent any accidents. Additionally, ensure your plants have enough space to grow and receive adequate sunlight and water.
Hydroponic Systems :
Hydroponics is a method of growing plants without soil, using nutrient-rich water instead. This technique has gained popularity recently due to its efficiency and ability to grow plants in small spaces.
Benefits of hydroponic systems
One significant advantage of hydroponic gardening is that it uses less water and nutrients than traditional soil gardening. Additionally, hydroponic plants tend to grow faster and produce higher yields.
Types of hydroponic systems
Several types of hydroponic systems include deep water culture, drip irrigation, and ebb and flow. Each system has its advantages and is suitable for different plants and spaces.
Tips for successful hydroponic gardening
If you’re new to hydroponic gardening, here are some tips to help you get started:
- Choose the right system for your space and plants.
- Monitor pH levels regularly and adjust accordingly.
- Keep an eye on nutrient levels and replenish as needed.
- Maintain proper lighting and temperature for optimal plant growth.
- Practice good hygiene to prevent the spread of diseases.
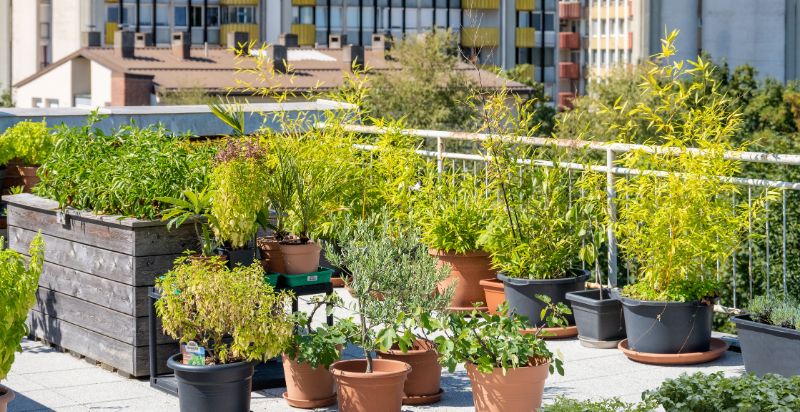
Rooftop gardens :
Rooftop gardens are becoming increasingly popular in urban areas due to limited outdoor space. These gardens provide a beautiful green space and offer numerous environmental benefits, such as reducing energy consumption and improving air quality.
Important factors to consider
Before creating a rooftop garden, it’s essential to assess the structural capacity of your roof and its ability to support the weight of the garden. Other crucial factors to consider include access to water, sunlight, and wind exposure.
Choosing plants for a rooftop garden
Selecting the right plants is crucial for a successful rooftop garden. Plants that are drought-resistant and can withstand harsh weather conditions are ideal for this type of environment. Some popular options include succulents, herbs, and dwarf fruit trees. It’s also important to consider the weight and size of the plant, as well as its root structure.
Maintaining a rooftop garden
Regular maintenance is key to keeping your rooftop garden healthy and thriving. This includes watering, fertilizing, pruning, and pest control. It’s also essential to regularly check for any structural or drainage issues that may arise.
So why not use that unused space and turn it into your own green oasis? Whether you live in an apartment building or a single-family home, a rooftop garden is a great way to add some greenery to your surroundings and contribute to a healthier environment. With proper planning and maintenance, you can create a beautiful and sustainable rooftop garden that will benefit both you and your community. So start planning today and reap the rewards of having a peaceful, eco-friendly space above your head!
What to plant in a Victory Garden?
So, you have decided to start a victory garden and are wondering what to plant. First of all, congratulations on taking the initiative to grow your food! Victory gardens were popularized during World War I and II to support the war efforts by reducing pressure on the public food supply. Today, they are making a comeback as people are becoming more conscious about their food sources and the environmental impacts of industrial agriculture.
Before we dive into specific plants, it’s important to consider your climate and growing conditions. Different regions have different climates and soil types, which can greatly affect what plants will thrive in your garden. It’s also essential to consider the amount of sun and shade your garden receives throughout the day, as this will determine which plants will do well.
Some general tips for a victory garden include choosing easy-to-grow and high-yielding plants, planting in raised beds or containers if you have limited space, and rotating your crops each year to prevent nutrient depletion in the soil. Now, look at some specific plants that are great for a victory garden!
- Leafy Greens – Lettuce, spinach, kale, and other leafy greens are perfect for a victory garden. They are easy to grow, require minimal space, and contain nutrients.
- Root Vegetables – Carrots, radishes, beets, and turnips are all excellent choices for a victory garden. These hardy vegetables can withstand colder temperatures and be harvested throughout the growing season.
- Herbs – Growing herbs is a great way to add flavor to your meals and save money at the grocery store. Some popular herbs for a victory garden include basil, parsley, mint, and rosemary.
- Tomatoes – Although these plants may require more care and attention, they are well worth it! Tomatoes are versatile and can be used in a variety of dishes. Just be sure to choose a variety that is suitable for your climate.
- Beans and Peas – These legumes are great sources of protein and add nitrogen back into the soil, making them perfect for crop rotation. They also grow quickly and can be harvested multiple times throughout the season.
- Berries – If you have enough space, consider adding berry bushes to your victory garden. Strawberries, blueberries, and raspberries are all relatively easy to grow and provide delicious and nutritious fruits.
- Squash – Summer squash, zucchini, and winter squash are all great options for a victory garden. They can take up quite a bit of space, so be sure to plan accordingly, but their abundant harvest makes them well worth the effort.
- Potatoes – Another excellent option for crop rotation, potatoes are easy to grow and provide a hearty addition to any meal. Just make sure to choose a variety suitable for your climate and soil type.
- Flowers – Don’t forget to add some flowers to your victory garden! Not only do they add beauty and color, but they also attract pollinators that are essential for the success of your vegetable plants. Some great flower options for a victory garden include sunflowers, zinnias, marigolds, and cosmos.
These are all great choices for a victory garden, but be bold, experiment, and try out new plants. Consider talking to local gardening experts or researching what grows well in your specific climate and soil conditions.
Tips for Maintaining Your Victory Garden
As the gardening season transitions into the warmer months, it is crucial to maintain your Victory Garden to ensure a bountiful harvest. This section will discuss some tips and practices for keeping your garden healthy and thriving.
Watering
Watering is an essential aspect of maintaining any garden. However, with a Victory Garden, ensuring proper watering becomes even more critical. Here are some tips for efficient and effective watering:
- Water deeply: Instead of frequent shallow watering, watering your plants deeply at least once a week is better. This encourages deep root growth and makes the plants more resilient to drought.
- Morning is best: Water your garden when the temperature is cooler. This will prevent water from evaporating too quickly and reduce the risk of fungal diseases.
- Water at the base: Directly watering at the base of plants instead of sprinkling them from above helps to reduce water waste and prevents foliage diseases.
Mulching
Mulching is a fantastic way to keep your Victory Garden healthy. It involves covering the soil around your plants with organic material, such as shredded leaves or straw. Mulching provides numerous benefits:
- Retains moisture: Mulch helps to retain soil moisture by reducing evaporation. This means you will have to water your garden less frequently.
- Suppresses weeds: A layer of mulch is a barrier for weeds, preventing them from sprouting and competing with your plants for nutrients.
- Promotes soil health: As the mulch decomposes, it adds essential nutrients to the soil, improving its overall health and fertility.
Fertilizing
Proper fertilization is crucial for a productive Victory Garden. While adding compost or organic matter to your garden is often enough, some plants may require additional fertilizer. Here are some tips for fertilizing your garden:
- Choose the right type: Many different types of fertilizer are available, including organic and synthetic options. Choose a fertilizer that is suitable for the plants you are growing.
- Follow instructions: Always read and follow the instructions on the fertilizer packaging carefully. Applying too much or too little can harm your plants.
- Apply at the right time: Applying fertilizer at the right time is crucial. Generally, it is best to fertilize in early spring before planting and then every four to six weeks during the growing season.
- Water after application: Watering your garden after applying fertilizer helps to distribute it evenly and prevents it from burning your plants’ roots.
Pests and Diseases
If not properly managed, pests and diseases can wreak havoc on your Victory Garden. Here are some tips for preventing and managing common garden pests and diseases:
- Practice good hygiene: Keeping your garden clean and debris-free can prevent the buildup of pests and diseases.
- Rotate crops: Rotating your crops each season helps break the cycle of pests and diseases specific to certain plants.
- Use natural methods: Consider using natural methods, such as companion planting and homemade sprays, to prevent or manage pests and diseases.
- Identify problems early: Regularly inspect your plants for any signs of pest infestation or disease. Catching them early can prevent them from spreading and causing more damage.
Harvesting
The ultimate goal of a Victory Garden is to provide fresh produce for your family. Here are some tips for successful harvesting:
- Harvest at the right time: Each type of plant has its own ideal time for harvesting. Refer to seed packets or gardening resources for guidance.
- Use proper techniques: Use clean and sharp tools when harvesting to prevent damaging plants or spreading diseases. Properly storing harvested produce can also help prolong its freshness.
- Rotate harvesting: To avoid depleting one area of your garden, rotate the areas where you harvest each time.
Preserving
Preserving your garden’s bounty allows you to enjoy fresh produce even after the growing season. Here are some methods for preserving:
- Canning: Canning is a great way to preserve fruits, vegetables, and meats. It involves sealing food in jars or cans and heating it to kill bacteria.
- Freezing: Freezing is an easy and convenient way to preserve produce. Wash, chop, and freeze your fruits or vegetables for later use.
- Drying: Drying can be done in an oven or a dehydrator and is a great way to preserve herbs, fruits, and vegetables. Once dried, store them in airtight containers.
- Pickling: Pickling involves preserving food in vinegar or brine. It’s a great way to preserve vegetables like cucumbers, carrots, and onions.
Conclusion
Victory Gardens serve as a reminder of the strength and resilience of individuals, communities, and nations. Not only do they provide fresh produce and promote self-sufficiency, but they also bring people together and create a sense of community. So whether you have a small balcony or a large backyard, consider starting your Victory Garden and reap the benefits for yourself and others.
- Lulo: Description, Flavor, Benefits, And Uses - March 19, 2024
- Banana Leaves: Benefits, Uses, Growing Tips & Cultural Information - March 11, 2024
- How to Grow Strawberries Successfully in Containers - March 8, 2024
2 thoughts on “Greening the Future: The Role of Victory Gardens in Addressing Modern Challenges”
Comments are closed.